
Zando Seller Center Guidelines
- Registration Process and Guidelines
- Product Creation Guidelines
- Content Guidelines
- Photography and Images Guidelines
- Order Processing Guidelines
- API Integration Guidelines
- How to Add a Barcode
Registration Process and Guidelines
To begin the Seller Center Registration process, please ensure that all relevant information is ready before submitting your profile.
NB:
- Profiles cannot be approved if any information is missing
- Please enter ‘fictitious information’ in the fields that you cannot complete
- Do not leave any fields blank
Mandatory Profile Information
Seller Account Information
- First and Last Name
- Email Address
- Phone Number
- Display Name / Shop Name
Business Information
- Legal Name / Company Name
- Legal Form
- Address 1
- Address 2
- City / Town
- Country
- Postal Code
- Person in Charge
- Business Registration No.
- VAT Information File – Upload file: (images, PDF files, and MS Word documents)
- Seller VAT
- VAT Registered – Yes / No
Shop Information
- Do you have a valid license to sell, distribute products you sell?
- How do you supply geographically?
- Do you own any brands for the products you are selling?
- Which brands do you want to sell?
- Main Product Category
- Number of products you plan to sell
- License File
Bank Account Information
- Account Name
- Account Number
- Bank
- Bank Code
- IBAN
- SWIFT
- Bank information (proof of banking details, including a stamped letter from the bank not older than 3 months)
Please check our Content guidelines to suit our requirements.
Creating Individual Listings:
Recommended for 30-50 styles.
- Seller Center > Products > Add a Product
- Browse Category > Select the main category > select the Sub category > click "Select".
- Product Information:
- Enter Name & Colour/Specification (no special characters). Every first letter of every word in your title must be in capitals and the following letters in lowercase.
- Brand – add the brand name as is on the item label. If the brand does not exist, speak to your Key Account Manager.
- Click “Enter Product Details”.
- More Product Details:
- Product Description: Average of 50 words/ 4 sentences.
- Index: Tick the box to help convert your keywords/phrases to search terms/phrases.
- Gender: This should match the model image and the category.
- Colour: This should match the information in the item name.
- ColorFamily: This field is mandatory for certain categories.
- Return Policy: This should align with the Zando Policy.
- Click “Enter Product Details”.
- Product Pricing:
- Size/Variation: You will either select the size from the drop-down or add the relevant size if necessary. Colour variations are not allowed.
- Seller SKU: This is the stocking keeping unit you use to track a specific product.
- Quantity: The amount of units you have available to list on Zando.
- Price: The Recommended Retail Price. No sale prices to be added on new assortment.
- Click “Enter Product Details”.
- Images:
- Please check the image guidelines for more details.
- Click “Submit and Finish”.
Creating Products With The Bulk Listing Loader/Feed:
Recommended for 50 styles and above.
- Seller Center > Products > Import Products.
- Navigate to Download Templates > Product creation by category > Click the relevant category.
- Scroll down to the bottom of the page to find your download in XLSX in the ‘Exports’ section.
- Remember to ‘Enable Editing’ in the yellow bar on top of the excel sheet.
- The feed file contains an Introduction, as well as the Upload Template, Categories, Brands and Options.
- Introduction: This provides you with an overview on how to use this file.
- Upload Template: This is what you will use to add the details for your products. Mandatory fields are indicated in line 2. Images require links for the feed to upload successfully.
- Category: This relates to the main category chosen for this file. You will use this to populate Column C.
- Brand: This is a list of brands created in our back-end system.
- Options: This will help you determine the color family and return policy where necessary for your product.
- Note: Be sure to remove the examples in line 4.
- Upload Template Entry:
- Name: Should be in the format: Item Description| Specification e.g. Pin Stripe Chino Black.
- Brand: Select your brand, as per the item label, from the drop-down.
- Primary Category: Select from the drop-down.
- Price: Add the RRP.
- ParentSKU: Use this to group your product size variations together. See ‘How to create a variation’.
- Quantity: Add the units you have available to sell on Zando.
- Description: Add the main selling points of the item.
- SellerSKU: Fill this with your stock keeping unit.
- SeoIndex: Enter this area as ‘1’.
- Variation: Add the size of the item.
- Color: This adds to the listing content.
- ColorFamily: This adds to the listing content.
- MainImage: Link required to the cloud storage that Zando can access.
- How to create a variation:
- Fill the SellerSKU field with the relevant stock keeping unit in Column O.
- Fill the size variation size field in Column S.
- Use any one of the seller SKU’s and populate this for all fields in the ParentSKU that belongs together in that variation set.
- Example:

- Saving & uploading your file:
- Click the ‘File’ tab on your Excel and then ‘Save’.
- Or click the close button ‘X’ and then ‘Save’.
- Navigate to Products > Import Products > Import Mode: Create new products > Select File: Browse and upload the saved template > Upload File.
- Once the file is uploaded, it may take some time for the listings to feed through to the system.
- To monitor the feed upload status, a bar will be displayed above ‘Import Products’. If there is an error with the feed, you will be given the reason and the option to click the link to the error feed file. You can also find this error feed file in the feed-table below the import section.
- The error report feed will show you the reason for the failed upload in Column A. This will help you amend the original listing loader and re-upload the file.
-
Your newly created listings will be displayed in the Products > Manage Products tab on Seller Center.
Best Practice:
- Under the Seller SKU section, you have to give each variation a unique style code – it has to be different for each size.
- The columns with the drop-down options cannot be filled in freely (i.e. you cannot just type anything into that space; you have to select an option from the list given).
- Remember that when you wish to select the Primary Category of a product, you cannot click and drag your selection, as it will alter the format of the document, and you will not be able to upload.
- If you wish to use the same category twice, you can simply copy that row, and paste it into the other relevant sections.
- If you do not have image links, you can include the following link "Image Coming" and amend at a later stage: https://res.cloudinary.com/dimd0zz2x/image/upload/v1579679276/Coming-Soon_nvytrp.jpg
- For the Error Report Feed – remember to remove the listings that have been uploaded successfully before re-uploading the failed SKUs/fields.
How do I create good content?
Please find the guidelines below on the different fields that you have to fill when adding products.
Name
The name should consist of the name of the brand followed by the actual product name.
If available, you can add the color, edition, specialty.
Brand
Name of the brand.
Category
Important to determine that the right product attributes are set for the product.
Colour
It has to obey the main color that's dominant in the product. If it consists of more than one color, it can be referred to as "multi". It can also be a certain shade of a color or your brand-specific color description, eg Cerise Pink.
Product description
Enter major highlights of the product or unique selling points, to make the purchase decision for the customer easier.
Writing of an average of 50 words are required, usually set up in 4 sentences.
The first line opens with the product name and brand.
Following are two sentences describing key elements of the product
The final line is a suggestive styling line.
Images
Please refer to the Photography and image guidelines.
Photography and Images Guidelines
Requirements
You can use your own images if shot according to our requirements below or Zando can shoot your product.
If you shoot your own product:
See the below guidelines on how to save your supplied images along with the Do and Don’ts. This will ensure your images do not get rejected and your items can go to the market as soon as possible.
- Image specifications
- Program option
- Do’s
- Don’ts
- License
Image specification
- All images must be placed on a grey background with RGB values of 240
- Colour Code: F0F0F0

- Size: 8 Bit, RGB Mode
- Resized to 680 Pixels x 680 Pixels
- JPEG file format
- Saved at 12 (Highest) quality setting at 300 DPI

- Image size may not exceed 200kb and should not be less than 50kb
Program option
If you do not have a professional program such as Adobe Photoshop to crop or resize your images, please try this free program with steps below:
Open Befunky in your browser: https://www.befunky.com/create/
Important to first crop to a square and then to resize the image
Steps:
1. Drag your image into the screen

2. Edit > Crop > Aspect Ratio: Square (1:1) > Apply
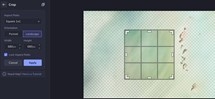
3. Edit > Resize > Width 680 px x Height 680 px > Apply

4. Save
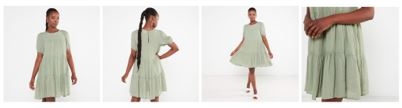
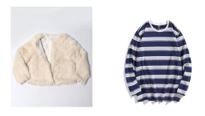
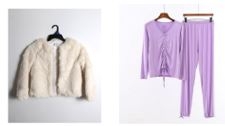
Do’s
Please see below examples of how images should be sent through.
- All Products must sit in the middle of the frame. Centred on a grid structure.

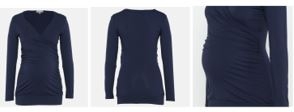
- Apparel images must have a front close-up shot, back shot, longer length shot and detail shot.

- Shoe images must have a 360 degree view of the item. 90 Degree angle facing to the right is the most important image.

- Handbags must have a front, 45 degree angled shot and a back shot.

- Apparel items shot on a mannequin must be deep edged out neatly to represent the item correctly. Showing the inside neckline.
Extra do’s to adhere to:
- Frame the picture so that the model’s head and/or feet touch the top/bottom of the image frame.
- Ensure the floor is cleaned up in Photoshop leaving no scuff marks.
- Remove any objects that distract from the item, out of the frame. Neaten up the area where you are shooting.
- Shoot products in controlled lighting set up; as natural light outside will not create consistent lighting as an overall look and feel.Main light should come from the front-above of the model with a fill light on the left.
- Use a photographic camera to capture images to ensure your images are of a high quality standard.
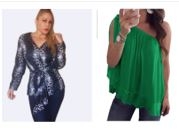
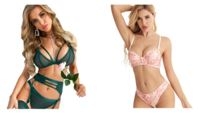
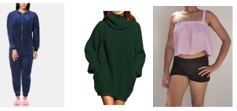
Don'ts
Please see below examples of images we will not be able to accept:
- Images where products have been cut out and placed onto a model in post production.
- Images not retouched by a professional.
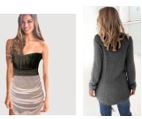
- Inconsistent background.
- Full range of images must be consistent in background and quality of imagery.

- Apparel items are not allowed to be shot flat on the ground.
- No backgrounds with draped cloths, different grey backgrounds than specified, coloured or white backgrounds.

- No images that are blurry, pixelated, or have jagged edges.
- No products are allowed to be hung on a hanger.
- No visible mannequins are allowed to be shown. All items must be deep edged out and placed on the correct grey background.

- No nudity or sexually suggestive images.
- No smartphone pictures shot with natural light.
- Shoot products in controlled lighting set up; as natural light outside will not create consistent lighting as an overall look and feel.
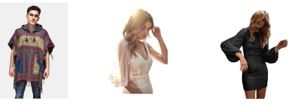
- Images where the model’s head is cut off.
Extra don’t to watch out for:
- Images that do not match the product title. Ie black Dress but the title says its Pink.
- Text, logos, borders, color blocks, watermarks, or other graphics over the top of a product or in the background.
- Images that show packaging or brand or swing tags, except for stockings or socks.
- Images with part of the product for sale cropped off by the frame edge.
- Colour of the item does not match the physical item.
License
You hereby grant Zando and its Affiliates, a non-exclusive, royalty-free right and license to (a) reproduce, distribute, transmit, publicly perform and publicly display the Images on Zando’s platform, in whole or in part, in any manner and (b) modify or adapt the Image, in whole or in part, in any manner the Image.
If Zando shoots your product:
Zando charges a service fee to shoot your images. Please refer to Marketplace Vendor Agreement for further information.
Below is the process you will need to follow.
- Enter the product details (of the items you want shot) on the platform first
- The seller has to add a list of items they're sending to Studio (item name, SKU, size).Please request the studio sample sheet from your account manager.
- This list has to be attached to the box
- Please pack one size per style to be shot - a size small/30 ( female ) / size Medium/32-34 ( Male )
- The box needs to be addressed to ZANDO STUDIO
- Account Manager to create the tracking code, consisting of the number of items packed | Brand name | Date
- Example: 15DreamFashion28/02/2020
- Seller to add tracking code to their box
Zando
7-8 West Building, North precinct,
Topaz Boulevard, Montague Gardens,
Cape Town, South Africa
Our Studio will inform your Key Account Manager when your samples will be ready for collection.
The lead time is usually 2 weeks, but we will keep you in the loop throughout the process.
USE RIGHTS IF ZANDO SHOOTS YOUR IMAGES:
- Zando is the owner of the images.
- Zando grants you a royalty-free license to use the images on www.zando.co.za or your website.
- This license does not extend to model shots. Zando cannot grant a license to use model shots.
- Conditions for use on your website:
- You must reference Zando as the owner of the image on your website.
- You must provide a link redirecting potential customers of your Products to www.zando.co.za
- You are not entitled to use the Images for any other commercial purpose. I.e. to promote or sell your Products on any other platform.
- We charge a licensing fee if you want to use the Images on your website:
- R50 per set/config with a minimum of 4 sets/images. We charge per config whether there is 1 image or 6 images per config.
- You will be invoiced for a licensing fee.
- No ownership or copyright in any of the Images shall pass to you by the issuance of this license.
In order to provide the best customer experience, this training guide is focussed on assisting sellers with the process on how to pick, pack and deliver orders to the warehouse. This guide also highlights the returns and cancellation process.
Introduction
Once a customer places an order for one of your products on Zando, the system will generate an email notification through Seller Center and prompt you to process the order. This process of picking, packing and shipping to the designated hub must be done within 1.5 business days.
How to process an order to the designated hub:
Step 1: Navigate to Orders > Manage Orders.
- New orders will reflect as a pending order and you are required to update this to ‘Ready to ship’ within 24 hours.
- Tick the box next to ‘Print all documents for selected items’ and then ‘Go’.
Step 2: Select your Delivery Provider from the drop-down and then click 'Create package and Next'.
- The delivery provider is assigned to you upon sign-up according to your warehouse location. You cannot send products to all hubs.
Step 3: Now click ‘Ready to ship’.
Step 4: On this page, click ‘print’ (all documents printed here go in the box to the warehouse). Once you have printed the documents, click 'Continue'.
- You are welcome to package multiple orders in one box; however, you must ensure that each order has the matching paperwork attached.
Step 5: You will now be routed to the ‘Order Overview’ page where the pending order would have been moved to ‘Ready To Ship’.
- Once the order is updated, the system will send a notification to the customer that the order has been prepared and is on its way for delivery.
Step 6: Drop-off your order at the nearest hub. Or hand-over to your courier to ensure delivery to the warehouse.
- Please ensure that deliveries arrive at the warehouse no later than 12pm to ensure the 1.5 day SLA is met.
Best Practice:
- All orders should be updated from 'pending' to 'ready to ship' within 24 hours (business days). This will help ensure that your Seller Score is not negatively impacted.
- All orders should arrive at our warehouse within 36 hours (business days) of notifying you of the order, in order to fulfil our SLA of 3 -5 days delivery to the customer.
- Note: Please be aware that we are allowed to impose penalties or remove/restrict your selling privileges, should there be an inexcusable reason for late-deliveries and non-fulfilment.
- Any order not processed within 48 hours will automatically be cancelled by the system.
- Seller cancellations will impact your selling privileges on Zando.
My order has been handed over to the warehouse, what happens next?
- Before we dispatch the orders from our warehouse to the customer, we will do a standard quality check to certify that the item is in a new condition and matches what the customer ordered.
- Should items fail to pass this check, we will send the items back and charge the standard return fee.
- If the item delivered to the customer is materially different to what they had ordered, sellers will be obligated to replace and collect the item at their own cost – should this be requested by the customer. If this cannot be done, Zando will charge for the return as well as the re-delivery of the correct item; according to the courier fees.
What do the other order statuses mean?
- Shipped: The order has left the warehouse and is en route to the customer.
- Delivered: The customer has received the order.
- Canceled: All orders canceled by the seller, the system and/or the customer.
- Delivery failed: Zando attempted delivery of at least 3 times, however, the customer was not available.
- Returned: Orders that have been returned by the customer.
Returns on Zando
Returns Explained:
- Seller should align their return policy with that of Zando’s. This can be found here.
- Customers are entitled to return a product, without reason, up to 14 days and 30 days for any issue.
- Zando will collect and inspect the return to ensure that it is in a resellable condition.
- If the order is found to be in a different condition to what it was when it was sent to the customer, your account manager will discuss this with you.
- Once the 30 day return window closes on your order, Zando is no longer able to facilitate the return and the customer will be given the your details to discuss a refund or exchange directly.
Cancelations on Zando
I’m out of stock, how do I cancel the order?
- Navigate to Orders > Manage Orders > Order (to cancel).
- Scroll to the right and click on ‘Canceled’.
- You will now be directed to provide a reason from the drop-down. You will also be able to add any additional reasons for cancellation.
- Now click save to submit the cancellation.
The customer ordered 2, but I can only fulfill 1:
- Navigate to Orders > Manage Orders > Order (to cancel).
- Click the + sign on the right, next to the order number.
- From this drop-down, navigate to the item you want to cancel.
- Click on ‘Canceled’ and navigate through the workflow.
Integrate API to Seller Center will automate the following processes:
- Product creation
- Order processing
- Stock/quantity update
- Price updates
The link below will guide you further on what the next steps are:
https://sellerapi.sellercenter.net/
Benefits of Using GTIN Barcodes for Jumia Vendors
- Enhanced Visibility: GTIN Barcodes improve product categorization and listing, leading to better searchability and visibility on the platform.
- Consumer Trust: Products with clear identification are more trusted by customers, enhancing their shopping experience.
- Efficient Inventory Management: Enables better tracking and management of inventory.
- Global Standards Compliance: Using GTINs aligns your products with international e-commerce norms.
2. Category Requirements for GTIN Barcodes
- General Requirement: Most categories on Jumia require a standard product ID (EAN, UPC, ISBN, or other GTINs) for listing items.
- Exceptions and Exemptions: Major brands generally require a GTIN, but exemptions may be requested for private label brands and specialized products in categories like Fashion, Health & Beauty, Computing, etc.
- Specific Categories: Categories like Livestock and Services do not require GTINs.
3. What are GTIN Barcodes and their Variations?
A Global Trade Item Number (GTIN) is a unique and internationally recognized identifier for a product, typically represented under a barcode. GTIN has several variations:
GTIN-13 (EAN/UCC-13): This 13-digit number is widely used outside North America.
GTIN-12 (UPC-A): This 12-digit number is primarily used in North America.
GTIN-8 (EAN/UCC-8): An 8-digit number predominantly used outside North America.
GTIN-14 (EAN/UCC-14 or ITF-14): A 14-digit number used for identifying trade items at various packaging levels.
4. Finding GTIN Barcodes for Products
- On Packaging: GTINs are usually found on product packaging, represented as a barcode.
- From Manufacturer: If not visible, consult the manufacturer's documentation or contact them directly.
- Online Databases: Use various online databases and tools for GTIN lookup using other product identifiers.
5. Step-by-Step Guide to Add GTIN Barcodes in Seller or Vendor Center
Single Product Update:
- Go to ‘Products’ -> ‘Manage Products’.
- Click ‘Edit Product’.
- In the ‘variants’ section, enter the GTIN in the ‘Barcode EAN’ field.
- Click ‘Submit’.
Bulk Update:
- Go to ‘Products’ -> ‘Manage Products’ -> ‘Import/Export’.
- Choose ‘Product’ -> ‘Export Products’ to get a list of products with missing GTIN codes.
- Fill in the missing GTIN barcodes in the excel template in the Product Id (‘Barcode_EAN’) column.
- Return to ‘Import/Export’ -> ‘Create Products’, and upload the filled excel file.
By following these guidelines, Jumia vendors can effectively use GTIN barcodes to enhance their product listings, ensuring compliance with global standards and improving their operational efficiency.